Pages

Ruins and whatnot

Monday, November 21, 2016

I've been quite busy, working on bunch of different things. Overgrown Ruins are finished and up in Unreal Marketplace, here is a link:


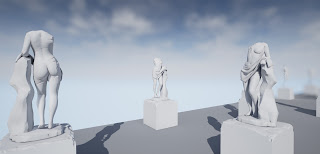
Finished another pack in the meantime too, more fancy statues. Better and generally more polished than previous pack too, imo. I was using cavity bakes for ambient occlusion in Unreal but actual ambient occlusion bakes look so much better, I don't even know why I decided to use cavity bakes for that, silly me. Slightly improved material, but still staying fairly basic. Optimized pipeline to create cloth and hair for statues as hassle free as possible, just gotta plan couple things ahead before doing actual sculpting, like making sure that there won't be any voids inside cloth folds or hair, and if those seem unavoidable there are couple of ways to deal with them too. Here are some shots of the new statues:


Quite liking how these turned out. Couple of close-ups to show off details, they really hold up well. Those AO maps really doing their job here too, they are somewhat exaggerated in post processing but hey, I'll call it artistic touch.

Unreal work

Wednesday, October 5, 2016

Before I started doing this project, had to think for some time how I want to approach texturing. To be honest, I consider texturing my weakest discipline therefore whenever possible I try to plan texturing out ASAP. With this project I decided to focus on making good sculpts, extract relevant data (normal maps, AO, cavities, other potential masks) and use that to blend bunch of stuff inside shader.

I’ve used this approach before and always had good results with it. I’ve been inspecting Epic’s work on Unreal Tournament and they doing fantastic job with it, lots of great things to learn from there. The approach they quite often use is the one I’m using for this project too, except that they tend to have even more masks and stuff than I do.

So here is the breakdown – I got my masks in what I call mixmap, it’s a texture with a different mask in each channel. I’m sure you’ve seen that stuff before. I got my AO in red channel, cavity in green and edge highlights in blue. Rendered AO and Normal in Xnormal, then passed the rendered normal map into Knald to get cavity and edge highlights (or concavity and convexity info). Used Knald most because it’s so much faster than rendering this stuff from high poly, even AO is pretty slow, but it’s much more accurate than from Knald. I can live with cavity/edge inaccuracies since I’ll be using them as simple masks, but I want AO to be good because I’ll plug that directly into AO slot in Unreal shader. So those are the maps so far – AO, Normal, Cavity, Edge highlights. Here is my shader noodle soup:


I reckon the screenshot itself isn’t much of a help for someone who wants to learn some stuff so I’m thinking of releasing small project with just one asset, fully textured and with the shader done. I can’t release whole project because it’s supposed to go to Unreal Marketplace but I guess one asset wouldn’t hurt things and could prove helpful to some folks.

So here is how the assets look so far, some basic lighting/PP done too:


There also is the leaking stuff. For that I’m using separate (3rd) UV channel, basically projected from front. The leak texture is horizontally tiling, you can increase/decrease tiling amount. Since its using projected UV map that took 5 secs to make there is some unwanted, dare I say, leaking here and there. Now I was considering several ways to get rid of that and the easiest in my opinion is vertex painting. Leak texture is lerped on top of everything else based on red vertex channel. So you can go to mesh paint mode and manually mask out areas you don’t want the leaking to be at.

Will see how things will go from there, there might be some problems with this lighting/PP setup in the long run but nothing that can’t be solved.


Sculpts, sculpts everywhere!

Saturday, October 1, 2016

Almost forgot how much time sculpting can take. Perhaps not the sculpting itself but the process of turning sculpt into game ready asset. This can quickly become into tedious crap that will slow creation process down so my main concern for a long time was to speed up low-polying/unwrapping/baking and while at the moment it’s fastest it’s ever I still sometimes feel like I’m hamstrung by loads of technical steps I have to take for things to be at highest quality possible.


Well, while this might sound like a rant, but I still like sculpting. Might like it less when I do it for a zillionth time but it still feels rewarding once you complete something that both looks good and is optimized and “properly” done.

Here are some sculpts I recently did:


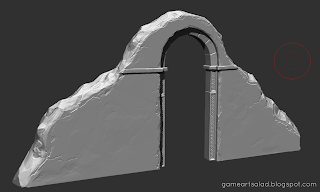
Last one is a quickie I did in over an hour. Fairly simple one but I like it, some kind of rock/rubble thing. There are couple more sculpts but feel like these are most worth sharing. Next step - bringing all of this into Unreal, see ya in couple of days!

Mountains are done

Tuesday, September 6, 2016

Finished the mountains quite some time ago, but some technical problems got in the way. My GPU crashed and burned so I had to stick with integrated GPU which meant that performance on quite a bit of stuff was rather low. Interestingly enough, performance on Headus UV layout was tragic on integrated GPU, pretty much unworkable.

But anyways, finished the mountain meshes, here are some shots.


Learned quite a few things in World Machine, but still feels like there is a long way to go before I can say that I’m good with it. Workflow is much more different that I’m used to, but it does make sense once you get past the initial barrier. Still haven’t come up with a good pipeline on how to tweak results out of WM, like adding specific features in, say, Zbrush once you done in WM. Tweaking and sculpting the heightmap isn’t really an issue but if after you sculpt it and you think of plugging it back to WM for texturing it gets really fiddly. For texturing you need certain information that heightmap alone simply doesn’t provide, although there are workarounds for that but in the end they still don’t provide great results. So at least for now, I got to be quite careful when tweaking heightmap afterwards, since I’m not doing textures afterwards but rather have to be sure that my tweaks work well with existing texture.


I’m sure there are ways to get past this but my tiny brain can’t figure it out. Yet. 

High are the Mountains

Tuesday, August 9, 2016

So I’ve been working on fairly low-poly background mountain meshes meshes to put in Unreal Marketplace. Initial plan was to go somewhat more fantasy oriented route, but it proved to be rather hard to pull off, had to scrap and redo a lot of work to achieve something I would like and in the end it’s not exactly fantasy, just a bit more stylized. Here are some latest screenshots:   


First screen is one mesh, second screen is another. In each of them just a single mesh was used to create the scene. One of the goals was to create meshes that would work great from multiple angles and would look different. World Machine is essential to create stuff like this, it simulates many complex geological phenomena that would be crazy hard to sculpt and texture manually.

My workflow was to create a quick sculpt in Zbrush that has main features, maybe even some of the smaller ones, render out heightmap, plug in into world machine and let it work with it. I much prefer manually sculpting the terrain rather than using tools or noise inside WM, because you have so much more control in Zbrush and it’s also very quick and easy to get heightmap out of ZB and into WM.

Here is a link to Unreal WIP forums:
https://forums.unrealengine.com/showthread.php?119339-Background-mountains&p=576398

Rooftops up in the Marketplace!

Friday, August 5, 2016

A bit late but you can get Futuristic top-down rooftop pack in Unreal Marketplace now:

https://www.unrealengine.com/marketplace/futuristic-modular-top-down-rooftop

If you like what you see, grab it!

Rooftops are finished!

Saturday, July 9, 2016

So we expanded the area quite a bit, added some extra assets, created additional bridges/platforms, added background city. While I created most of the playable stuff, Tomas did the background city. Looks great, very modular, can be used by variety of different projects, not only top-downs.

Quite happy how it all turned out. Nice approach for modeling the assets and overall visual style, will use it for future projects. Current scene relies very heavily on post processing to get that distinct look going, but that’s hardly a downside. Scene is fairly low on clutter but still has that dirty, grimy look and that was pretty much the goal. Most of the details are on the background, not to clutter up the playable space and not to obstruct navigation.


This asset pack should be hitting Unreal Marketplace soon, I’ll post a link once it’s up. Here are some new screenshots:


Some shiny rooftops

Thursday, June 30, 2016

Been working on these assets that we intend to sell on Unreal Markeplace as an asset pack. This is essentially a more or less finished short map for a project that quickly hit the dirt and was scrapped, though stuff that was done for it was fairly good quality.

It has been gathering dust in HDD for quite some time, so not wanting it to go to waste decided to polish it up, add some extra assets and put it on marketplace thinking that maybe some other people can find use for it. It's for a top-down game so intended to be viewed Diablo style.


Gotta say, I’m quite liking what we ended up with. We are using modular approach to asset creation, similar to what games like Mass Effect and Deus Ex were doing. Almost all the assets are using same textures, there is an atlas that has defining features, like lines, grates etc. (I’m sure if you’ve researched similar art style you’ve seen this stuff before) and on top it, projected on lightmap UV, there is some kind of unifying noise like dents and dirt for concrete (from tiling normal map), scratches for metal and so on (from tiling roughness).

And of course to bring this all together is strong lighting. There are a lot of color correction happening in post processing to make the scene look pretty stylized and dark and then using strong lighting to light up areas that would be important for gameplay. Almost all of the lights are static (and therefore prebaked), couple of them are stationary.

This is still WIP and there is extended area and background city that Tomas Narbutaitis is making so there is still quite a bit of room for improvement.

Statues up and running!

Sunday, June 5, 2016

So the pack got submitted and went online with latest marketplace update. You can check it out here:

https://www.unrealengine.com/marketplace/greek-statue-pack-vol

And the statues are finished

Tuesday, May 24, 2016

So the statues are finished and submitted to marketplace, they should go online in couple of weeks. Overall I’m happy how they turned to be and I think they are looking pretty good while staying in acceptable polycount and using acceptable texture sizes. Each statue has baked out, unique normal and cavity maps and also use tiling detail normal and tiling diffuse. Inverted cavity map is used in shader as a mask to give color variation in, well, cavities. I reckoned using tillable diffuse would get the job done and it seems it does in this case. I tried making a dedicated texture map but it I don’t think it was worth it in the long run because it wasn’t that much of an improvement upon tillable texture and even at 4k resolution it just doesn’t hold up to the texture crispiness you can get from tillable one.


On a side note, seems like lots of tech talk for something that is supposed to represent pure art but the tech side I think is rather important for marketplace items, because as I have faced myself you can really get bogged down in technical difficulties when you are working on project that is using large number of pre bought assets. So in this case we wanted to make sure all the problems are solved and assets are as “drag and drop” friendly. 

More work on statues

Sunday, May 15, 2016

Quite a few improvements and tweaks for the statues – more details, expanded materials, several material setups. For materials decided to go for a fairly modular approach – each statue has cavity and normal maps rendered out in Xnormal. Cavity map is used for Ambient Occlusion since I just felt it did a better job than Ambient Occlusion maps I tried and more importantly I use inverted cavity map to mask out areas for colorization. Materials have a ton of exposed parameters to customize almost anything so you can do quite a bit of stuff with it. Same materials used for metallic materials, just a couple of expressions toggled off that need to be turned on to get proper metallic look, like usage of separate roughness texture.


First pancake always is...

Thursday, May 12, 2016

I have been working on some statues for an asset pack that we plan to put in Unreal Marketplace. Seeing as there were no asset packs that focused on statues specifically, we decided to give it a shot. What I personally wanted to do was to develop pipeline that would allow fast asset creation and iteration without sacrificing quality.

Here are some early screenshots. Assets are in low poly, in engine, default lighting setup and very basic shaders. Posed anatomy models provided by Tomas Narbutaitis.


Initial plan was to make 3 statues with 3 damage variants, making it 9 statues in total. As the work went on it changed to 4 statues with 2 damage variants, 8 statues in total. Idea behind the first approach was that once you had properly done base sculpt, making damaged variants would be rather fast and easy. In the end it didn’t prove to be much faster than actually making completely new assets from scratch. You still had to spend pretty much the same amount of time low-polying, unwrapping UVs etc., “damaging” pristine statues still took quite a bit of time as you had to be quite careful to make things looks natural.


So that changed to 4 statues instead. I felt that this would probably be more beneficial in the end because you would get more varied assets in the end. While I think work could have gone faster (I spent over 2 weeks) overall I think it turned out to be pretty good. Good models, good textures, not many roadblocks so in the end everyone is happy.